Home Knowledge Base Tutorials Article
How to Create Connections Between Rooms (Markers) in a Tour
Posted on 2024-12-05
During a virtual tour, users should feel as though they are experiencing the tour in real life. To achieve this, once all rooms are created, you need to set up proper navigation between them.
Markers serve as navigation points within the tour, allowing users to click and move to the next location seamlessly.
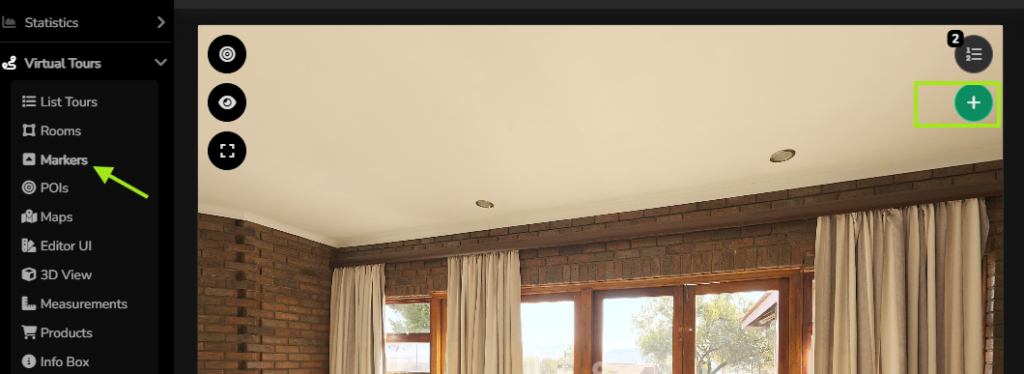
- Navigate to Virtual Tours → Markers from the side menu.
- Select the room where you want to add a marker and click the "+" button in the top-right corner.

In the Add Marker window, you can configure a navigation marker with the following options:
- Marker Style: Choose between an icon or a selection area for the marker’s appearance.
- Look At: Adjust the view to face the direction of the marker when clicked.
- Room Target: Select the room where the marker will direct users upon interaction.
- Override Initial Position: Specify the target room’s starting position upon clicking the marker.
- Add Marker to Go Back: Automatically creates a marker in the target room for returning to the current room.
To finalize and add the marker, click the "+ Add" button.

If you selected "Icon" as the marker style, you can also drag the marker to reposition it and customize its settings, including Perspective, Size, Visibility, Z-Order, and Scale.

If you selected "Selection Area" as the style, start by defining the area where the navigation element will be placed.

Next, create the navigation element by drawing a shape of your choice.

To speed up the process, you can use shortcuts available on the room thumbnails to add markers:
- Up Arrow Icon: Quickly adds a marker at the center of the pointer.
- "+" Icon: Opens the Add Marker modal with the target room pre-selected.

After adding a marker, you can easily modify its properties by clicking on it. A small menu will appear above the marker, allowing you to:
- Move it
- Edit its style
- Delete it
- Navigate to the target room

Clicking the edit icon will open a pop-up with three tabs:
- Settings: Change the marker type or select a different target room.
- Style: Customize the appearance of the marker icon.
- Tooltip: Add tooltip text or a room image that appears when hovering over the marker.

Click Save to confirm your changes.
Once you’ve added markers to all rooms, you can test the navigation in your virtual tour by clicking the eye icon (Preview) in the top-left corner.

You can now enhance your tour by adding content using Points of Interest (POIs).
Found this article helpful?
[ 1 Out of 4 Found Helpful ]
